Introduction to Feature Type Mapping
Feature Type mapping is the act of mapping one or more reader feature types to one or more writer feature types.It's similar to attribute mapping,except that it deals withFME Feature Types- layers or tables with their own schema - rather than attributes within a schema.
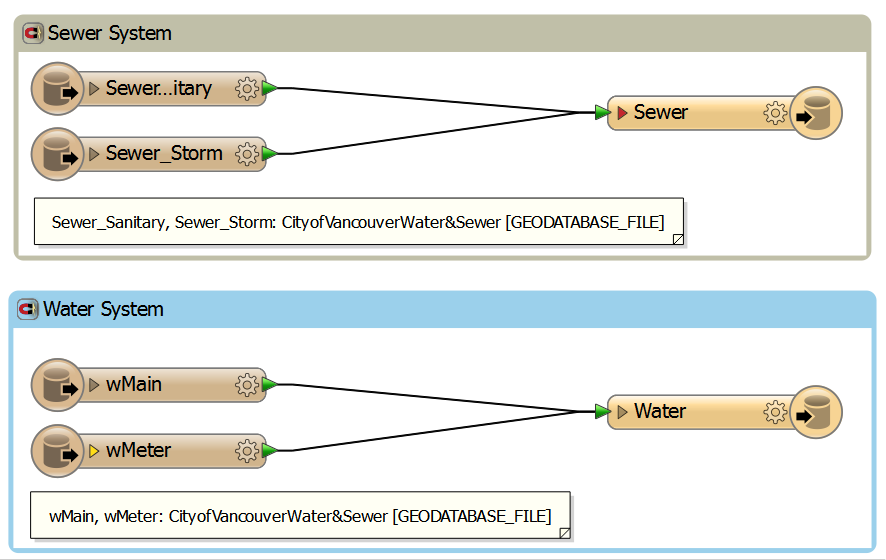
Feature Types generally represent layers,files,feature classes,or tables depending on the source data and FME reader parameters.In the example below,two distinct sewer feature types (defined as ‘feature classes' within ESRI's Geodatabase structure) are merged into one outgoing generic sewer feature type simply by connecting the two reader feature types to one writer feature type.The same is done for two water system feature types.
Basic workspace with four feature types output as two feature types:
This direct reader-to-writer schema mapping is possible within FME,but may not be suitable for complex feature type mapping or if attribute mapping needs to be performed at the same time as feature type mapping.In the following demo we'll introduce a simple example of Feature Type mapping using the SchemaMapper.
Downloads
Feature Type Mapping Demo
In the image above,multiple sets of Sewer and Water data are combined into two tables in a single dataset.In order to map these features with aSchemaMapper,use a simple lookup table to define the inbound and outbound relationships.This type of lookup table can be created in an Excel spreadsheet or in a text editor of your choice.
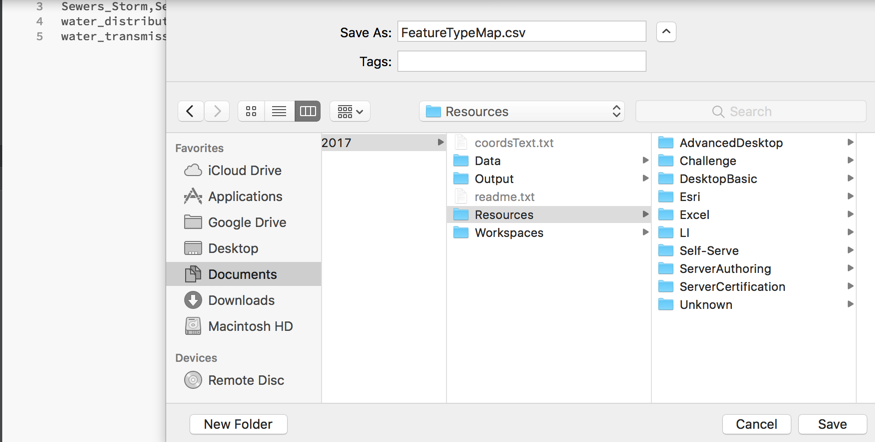
Step 1 -In the text editor of your choice,enter the following information separated by commas.(Feel free to skip this step and open the completed workspace to see how the final product works!)
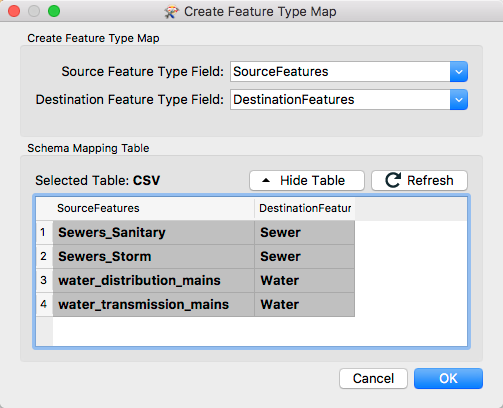
1 SourceFeatureType,DestinationFeatureType2 Sewers_Sanitary,Sewer3 Sewers_Storm,Sewer4 water_distribution_mains,Water5 water_transmission_mains,Water
The first line contains the field names for our lookup table.The following lines contain pairs of feature type names,with the reader feature type on the left and the writer feature type to map it to on the right.
Note:spaces before or after commas in your lookup table can confuse FME during Feature Type mapping.Best practice is to omit all white space unless it exists as part of the attribute values!
Save the table as a .csv format file:
Step 2 -Back in the workspace,open the SchemaMapper parameters dialog and set up the transformer to read in the CSV lookup table:
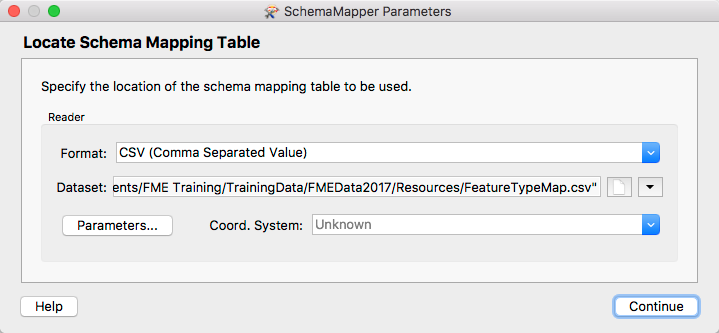
At this point you may take a look at the lookup table reader parameters.Here you will find both basic and advanced parameters that dictate how FME reads your lookup table,and how FME will use the lookup table to map attributes.
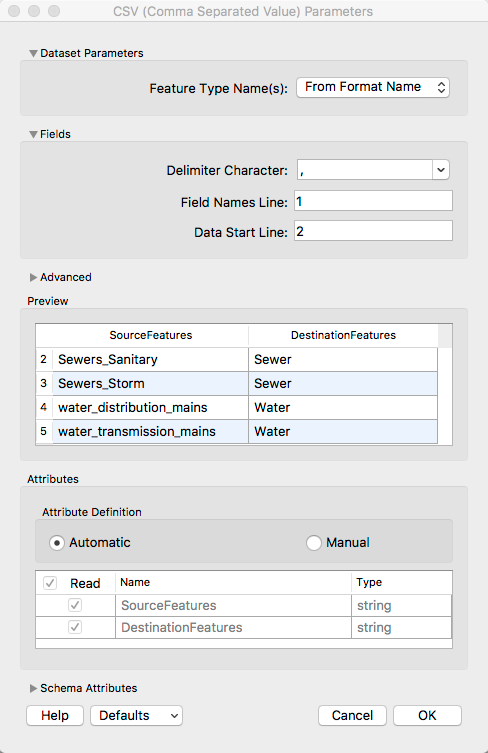
The default parameter values should be adequate for our example,and in the Preview pane you should see an accurate tabular representation of your lookup table.
Step 3 -Continue to the next set of SchemaMapper parameters,which define the "Actions" that the transformer will take on your data.
Since we're mapping Feature Types,click Add → Feature Type Map.You'll immediately be prompted for another set of parameters.Select your source and destination fields from the dropdown menus at the top.These fields are named according to the first row in the CSV file.
Similar to the Preview pane you saw earlier in the transformer reader Parameters,FME should display your lookup table,with the two columns in bold once they are successfully mapped:
Click OK to exit this dialog.The SchemaMapper transformer is now correctly set up.
Step 4 -At this point the features have been mapped to their correct feature types,in that the FME attributefme_feature_typehas been correctly set.This attribute can now be used to connect the features to the correct feature type in the workspace.
To do so,place anAttributeExposertransformer (which will expose thefme_feature_typeattribute) and anAttributeFiltertransformer (which will divide the data based on itsfme_feature_typevalue:
The AttributeExposer and AttributeFilter transformers complete the schema mapping process:

This image displays the end result of each step described in the previous paragraph.We now have a filter that will check thefme_feature_typefor the Sewer and Water values:
In the AttributeExposer parameters,pickfme_feature_typefrom the available list of attributes and click OK.Next,open the AttributeFilter parameters.The attribute we just exposed is the one we want to use as a filter,so select it from the dropdown list.Since we just mapped thefme_feature_typein the SchemaMapper from whatever our input was to either Sewer or Water,we need to add these two values to our list of "Possible Attribute Values".
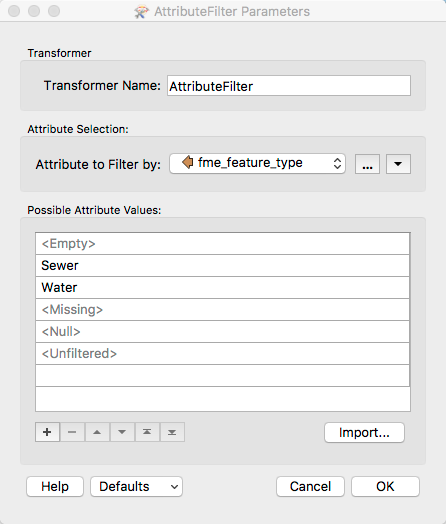
After you add the values,remember to connect each one to its appropriate writer feature type!

Recap -We are now about to run our Feature Type mapping workspace!Let's go over what we've set up:
- We have four incoming feature types.
- We created a lookup table defining how we want our four feature types to be mapped and read it into the SchemaMapper transformer.
- We exposed the
fme_feature_typeattribute which was redefined by the SchemaMapper so it could be used as a filter inside the workspace. - We filtered our features by an
fme_feature_typeof Sewer or Water. - We write the two new consolidated feature types.
This may seem like a lot of work and transformers compared to simply connecting multiple reader feature types to a single writer.However,if you imagine a larger production workspace with many dynamic inputs from various source datasets,combined with the need for attribute mapping before writing,this kind of 亚搏在线workflow offers the most in terms of flexibility,organization,and control.
Splitting the Feature Type mapping process up into multiple steps will also allow a greater degree of quality control and error reporting,as it is possible to see the routing of features and to track any features which are not successfully mapped,filtered,or written.
Download Information
The download contains the following files:
- Geodatabase: City of Vancouver Sewer.
- Shapefile: City of Vancouver Water
Workspace: Geodatabase/Shapefile → ACAD.Lookup Table: Feature Type Mapping CSV.
Data Attribution
- The data used here originates from open data made available by theCity of Vancouver,British Columbia.It contains information licensed under the Open Government License - Vancouver.
Additional Resources
- Feature Type Mapping Blog Entry:SchemaMapper II: Return of the Dragon.(This is part of a series of blog posts published around the release of FME 2009.The content may not be completely up-to-date but the concepts still hold true.)