Introduction to Attribute Mapping
Attribute mapping is the act of transforming and/or connecting one or more attributes of a feature to a new attribute or set of attributes.This can be as simple as renaming an attribute - as in the image below - or as complicated as renaming,dropping,merging,and creating new attributes simultaneously..
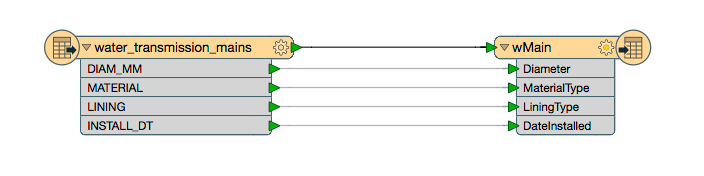
In the above image,source attributes are mapped to their corresponding destination attributes.For example,the source attributeDIAM_MMgets mapped to the destination attributeDiameter.
Simple one-off attribute mapping like this can be done by modifying theUser Attributesin a writer and by (re)connecting FME's visual attribute connectors from reader to writer attributes.
However,it is also possible to perform the same (or more complex) operation,with much more control,using the SchemaMapper transformer.
The following tutorial will demonstrate basic attribute mapping using a CSV lookup table and the SchemaMapper transformer.
Downloads
Attribute Mapping Demo using the Schema Mapper
To replicate the above mapping using the SchemaMapper,a simple CSV (Text) file containing a header line and field names will be used as a lookup table.This could alternatively be an Excel spreadsheet or any of the 50+ lookup table formats accepted by the SchemaMapper.
Step 1 -In the text editor of your choice,enter the following information separated by commas.(Feel free to skip this step and open the completed workspace to see how the final product works!)
1 SourceAttribute,DestinationAttribute2 DIAM_MM,Diameter3 MATERIAL,MaterialType4 LINING,LiningType5 INSTALL_DT,DateInstalled
Note:spaces before or after commas in your lookup table CSV can confuse FME during Feature Type mapping.Best practice is to omit all white space surrounding delimiters unless they are present in the attribute values themselves!
Notice that our column headers (ie field names or attribute names) appear on the first line,followed by our source and destination data.Save the table as a .csv format file.
Step 2 -In the SchemaMapper dialog,set up the transformer to read in the CSV lookup table:

At this point you may take a look at the lookup table reader parameters.Here you will find both basic and advanced parameters that dictate how FME reads your lookup table,and how FME will use the lookup table to map attributes.
The default parameter values should be adequate for our example,and in the Preview pane you should see an accurate tabular representation of your lookup table.
CSV lookup table reader parameters:

The first parameter lets FME know that we want to use the filename as the name of the feature type.It doesn't really make a difference for CSV,which has no feature type names anyway.
The second set of parameters defines the structure of our CSV,and how FME will read it for schema mapping.Because our lookup file uses commas to separate data,and because our first line contains field names,the default values here are exactly what we want.
In the Preview pane,you can see that when FME finds an attribute whose name is defined in theSourceAttributecolumn of the lookup table,it renames it to the name in the correspondingDestinationAttributecolumn.
Below the Preview pane,there are some options for further customizing the schema map;however,the Automatic setting will respect our current parameters and will work perfectly with our simple CSV and attribute mapping example.
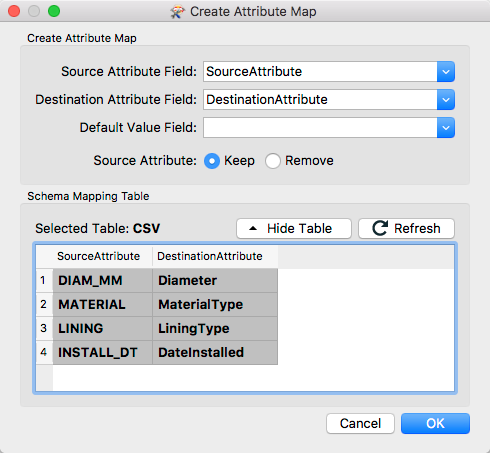
Step 3 -From the SchemaMapper reader window,continue to the next set of parameters,which deal with creating the "Actions" that the transformer will perform.Add an Attribute Map action and set the source and destination attribute fields appropriately.
Below,another tabular representation of your lookup table will appear with all data cells bolded when they are mapped.Accept the changes and return to the workspace.
Attribute mapping parameters:
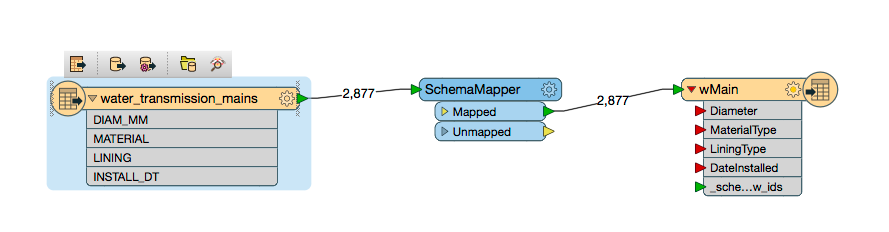
Note:Workbench won't display these mappings automatically (see below where the destination attributes are still red),but FME will still recognize and write the correct attributes for the destination schema.Alternatively,theAttributeExposertransformer can be used to expose these new attributes,which will then show as connected.
Here,writer attributes remain red and unconnected;however,they will be written according to our new schema map:
You can now run the workspace and inspect the output.The output dataset's schema will reflect the new attribute names.The workspace can now be built upon as required,for more complex attribute or feature type mapping.
In the image below you can see the new attribute names:

Download Information
The download contains the following:
- Shapefile: City of Vancouver Water
- Workspace: Shapefile -> Google KML
- Lookup Table: CSV for Attribute Mapping
Data Attribution
The data used here originates from open data made available by theCity of Vancouver,British Columbia.It contains information licensed under the Open Government License - Vancouver.
Additional Resources
- Basic Introduction to the SchemaMapper:Crouching Tiger Hidden Dragon.(This is part of a series of blog posts published around the release of FME 2009.The content may not be completely up-to-date but the concepts still hold true.)